Features and actions in the Dossier Overview
You are in the Dossier Overview.
What can you do here?
Good to know:
Only users with the Manager role can create dossiers.
Would you like to create a new dossier? Then, click the New Dossier button in the top right corner of the Dossier Overview.
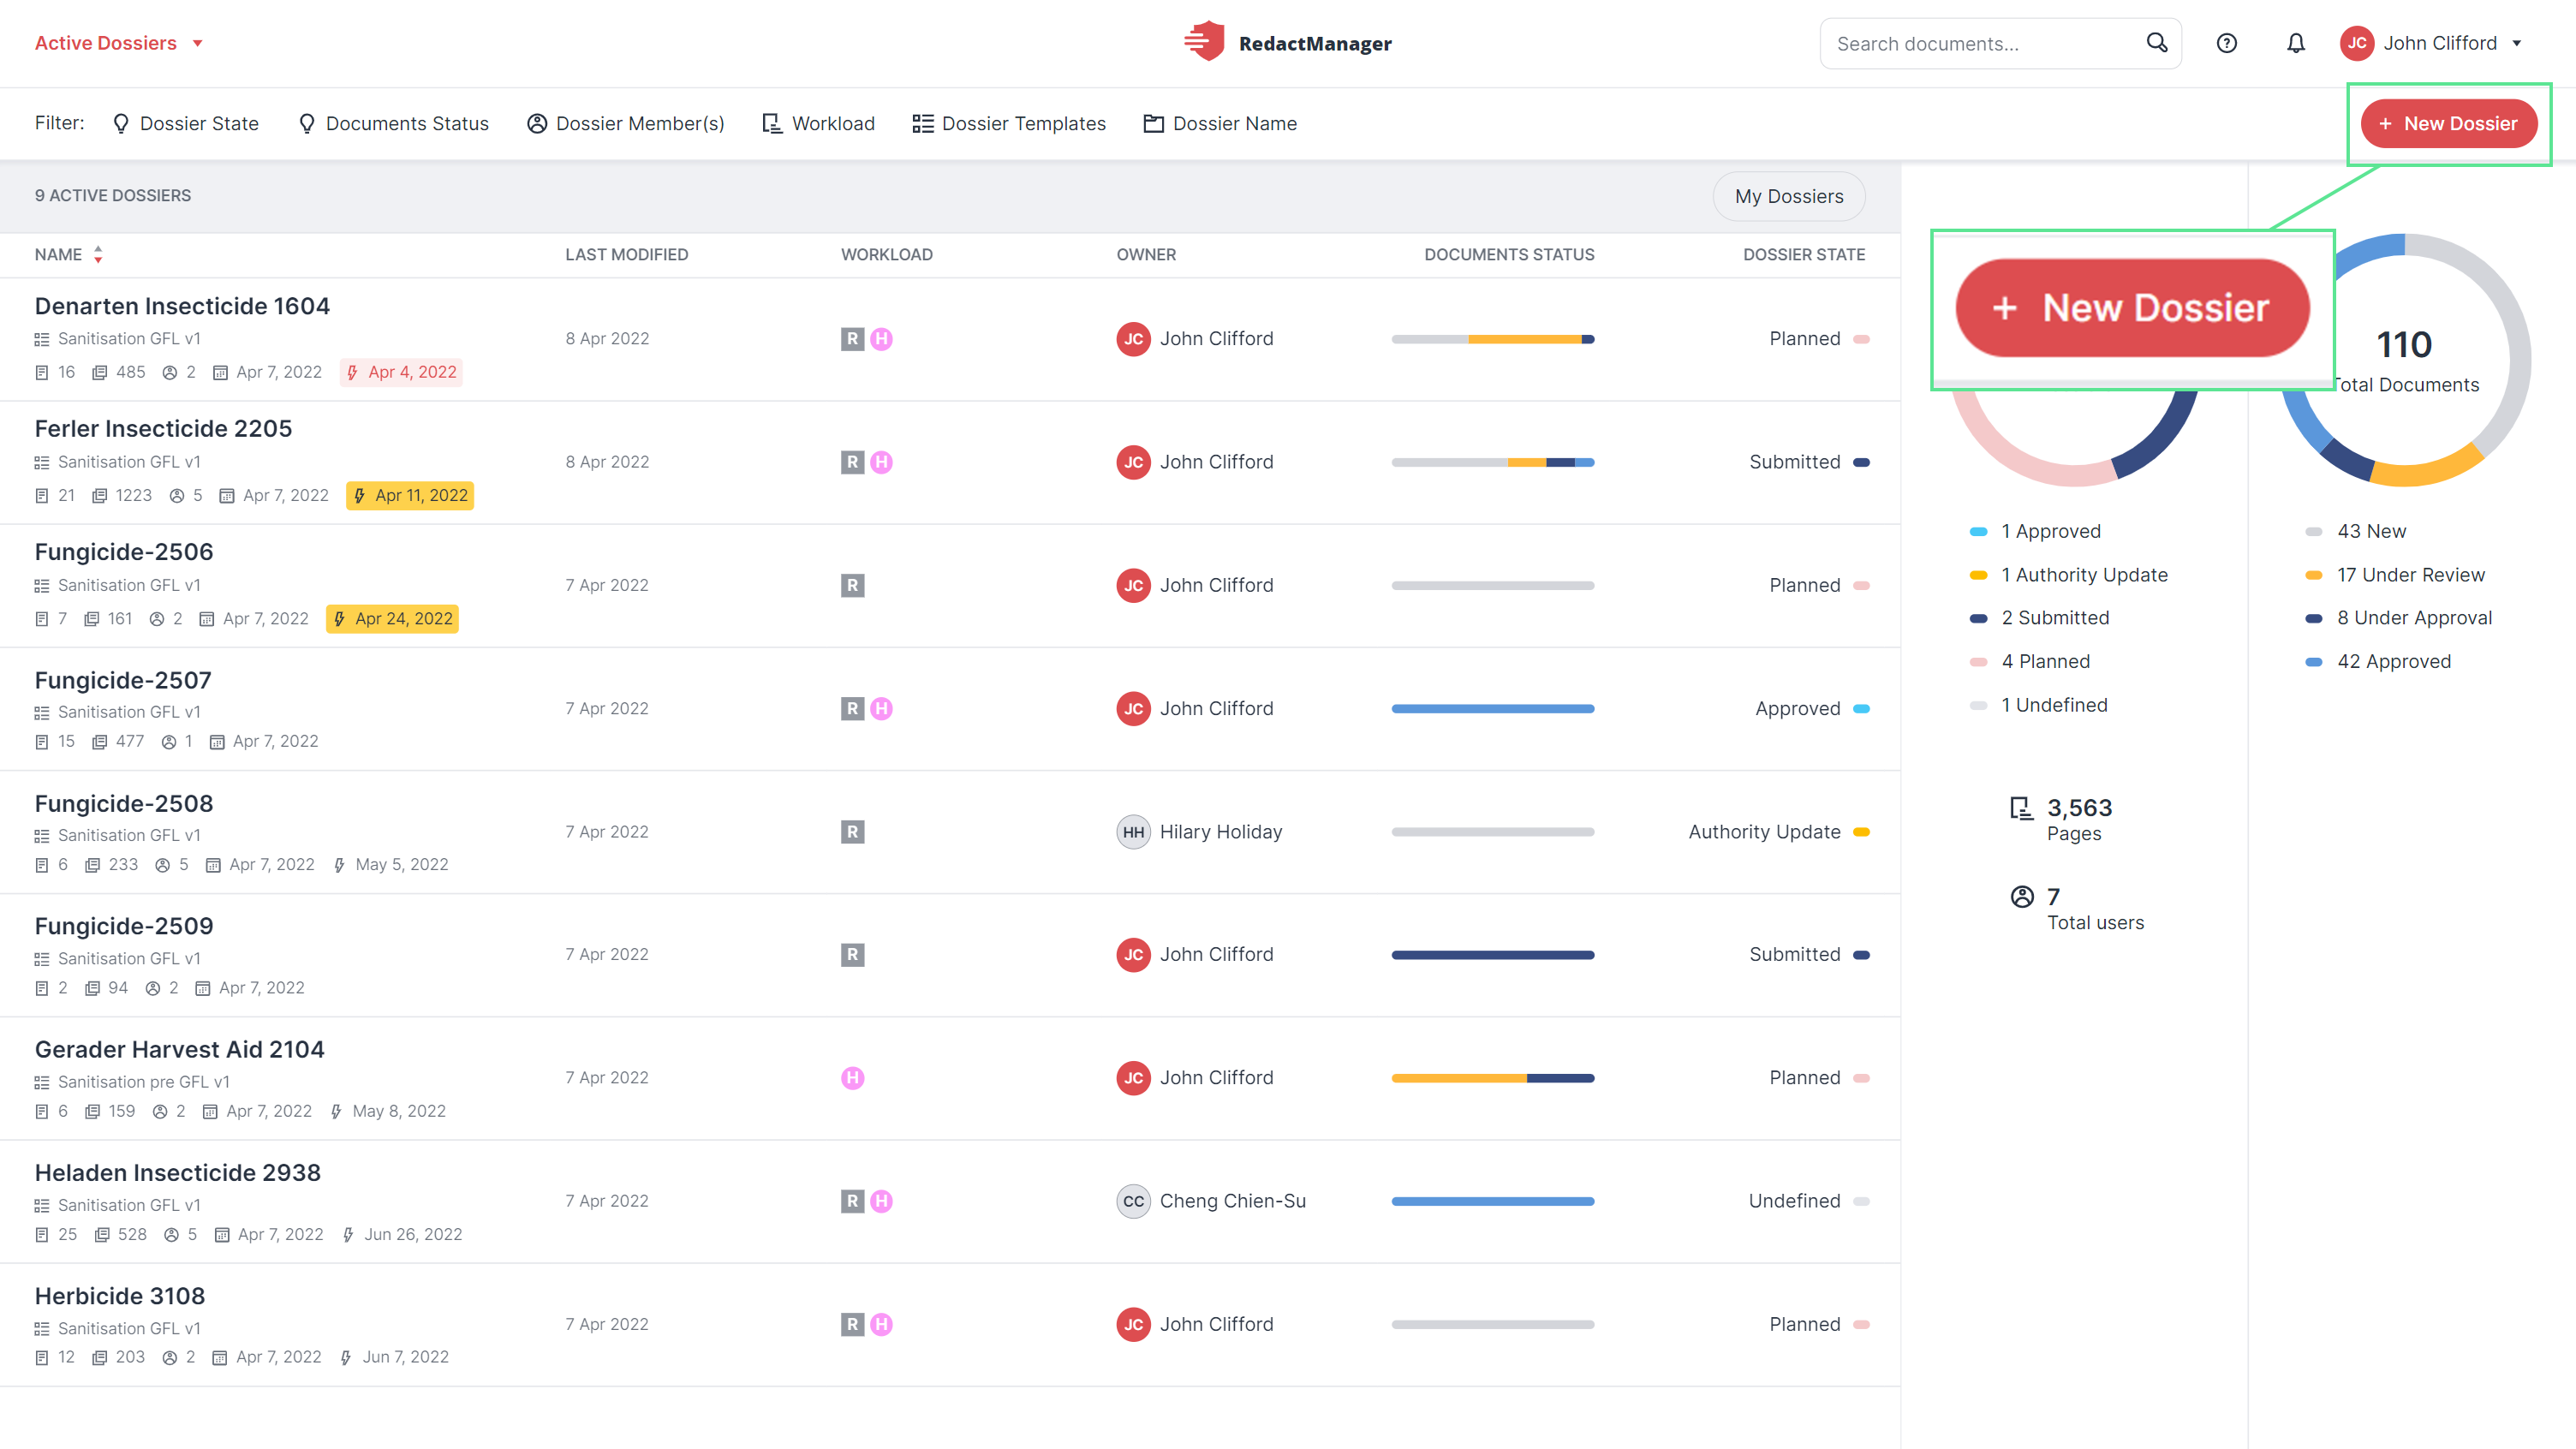
Create a new dossier
The "Create Dossier" dialog opens. Mandatory fields are marked with a red asterisk.
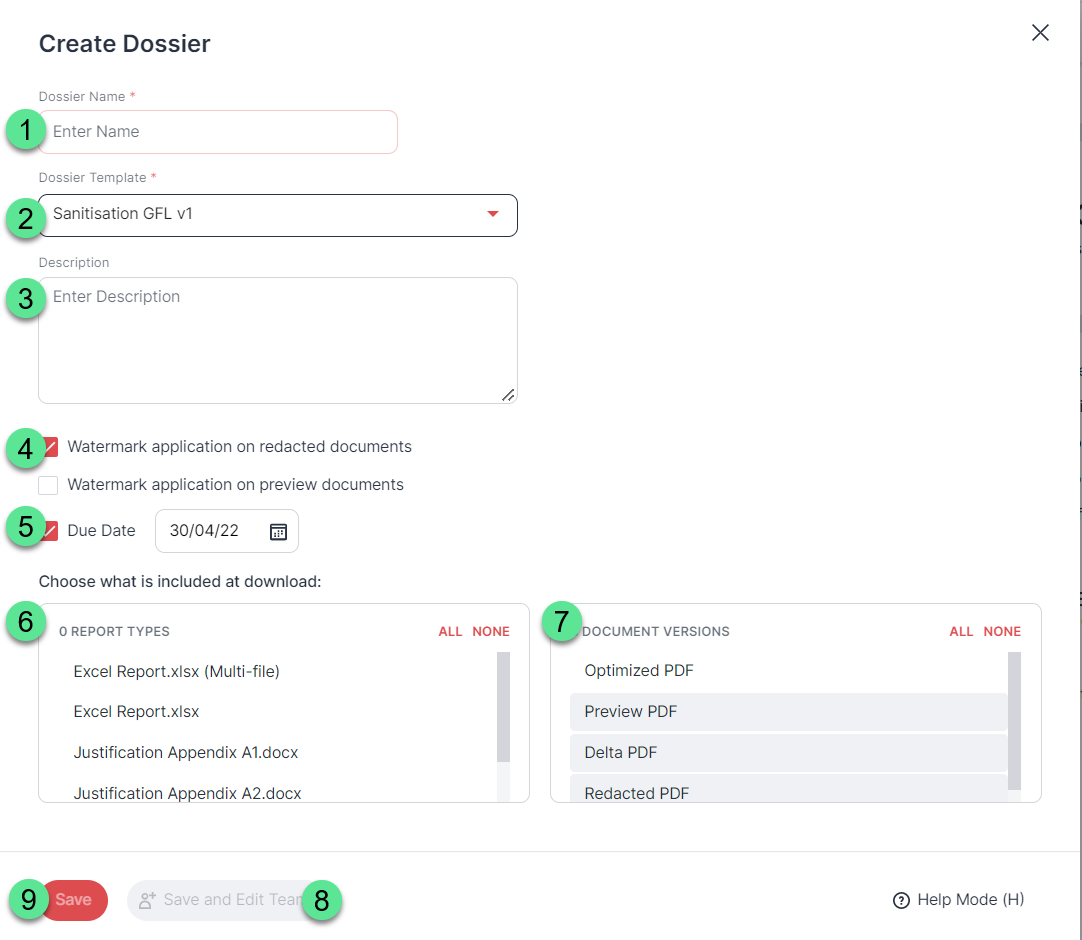 |
"Create Dossier" dialog
Complete the form as follows:
Dossier name: Enter a name for the dossier.
Dossier template: Select the dossier template that should apply to the dossier.
Description: Here, you can add a description. The description is optional.
Watermark application on redacted documents and/or Watermark application on preview documents: If you select the checkboxes next to these options, the redacted documents and/or the preview documents in the download package will be watermarked.
For example, the watermark can contain information about the copyright holder. The watermark can be created by users with the Admin role. Managers can only activate the stored watermark.
Due Date: You can optionally activate this field to specify by when the processing of the dossier should be completed.
An input field then appears. Enter the relevant date or click the calendar icon to select a date.
The period entered is for internal information only. The dossier can still be processed after the deadline has expired.
Report types: Select which reports should be included in the download package. Due to the file size limit of Microsoft Word (Word becomes unstable if a certain number of pages is exceeded) redaction reports that contain files with a lot of redactions are chunked into multiple files. The redactions from one document are all contained in the same redaction report file.
Document Version: Select the document versions you want to include in the download package (Optimized PDF, Preview PDF and/or Redacted PDF).
Save and add team: Click on this button to save the dossier and directly add other users as Reviewers. In addition to the name of the user, check the box next to Make Approver if you want them also to receive Approver authorization. You can also add further users to the dossier at a later point in time.
Save: If you click this button, the dossier is saved without any further action.
Save and add team: Click on this button to save the dossier and directly add other users as Reviewers. In addition to the name of the user, check the box next to Make Approver if you want them also to receive Approver authorization. You can also add further users to the dossier at a later point in time.
Good to know:
As the dossier creator, you automatically hold the Dossier Owner permission.
Good to know:
Only users with the Manager role can edit dossiers.
You are in the dossier list. Move the mouse over the list and stay on the dossier that you want to edit. The Edit icon  and the Download icon
  appear on the right.
Select the Edit icon to edit the dossier.
The configuration window opens.
On the different sub-pages of the window, you will see the following buttons below:
Save: | Save your selection in the respective area without any further action. |
Save & Close: | Save your selection in the respective area and close the configuration window at the same time. |
Undo: | Undo your changes in the respective area. (Changes, since the last time you saved, are undone.) |
Under Dossier Info, you can change the dossier name, the date for the dossier, and the dossier description.
You can also see which dossier template the dossier is linked to. However, you cannot change the dossier template.
You can enable or disable the watermark on redacted documents and/or preview documents.
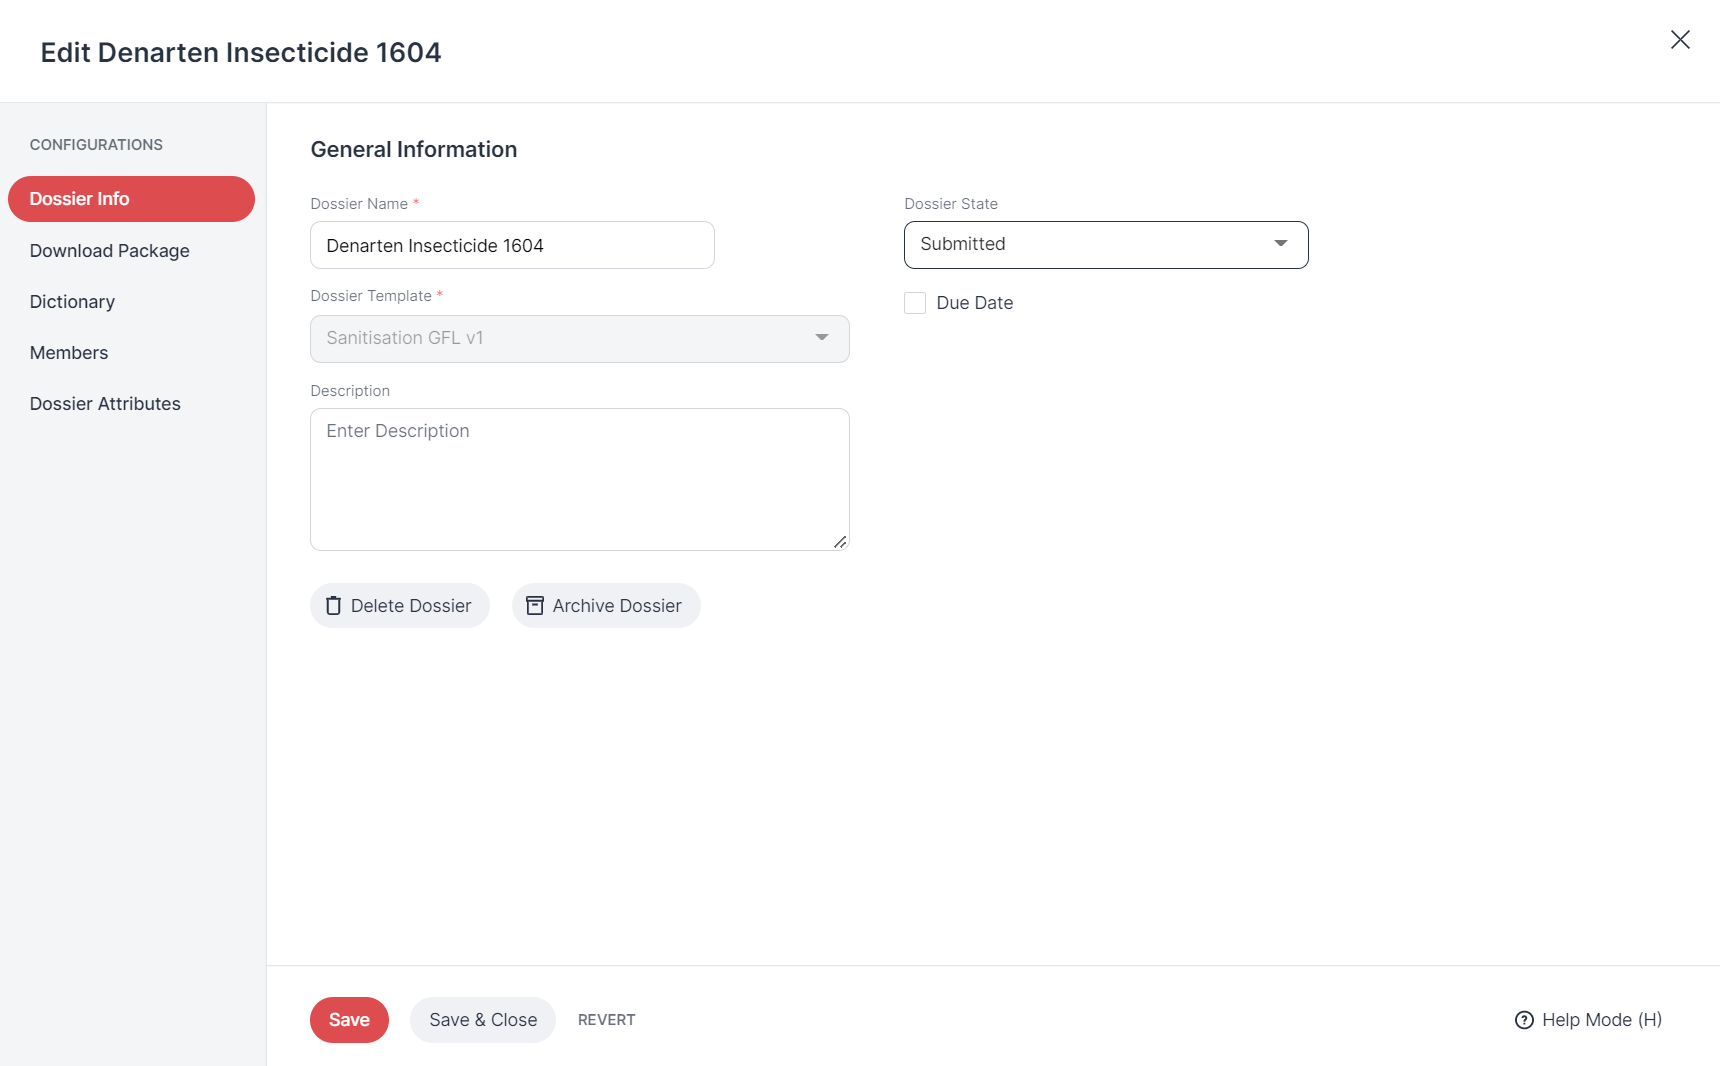 |
Dossier info
If you are the Dossier Owner, you can change the dossier status via the Dossier Status drop-down. In this drop-down, you will find the dossier states that have been created by one of your Admins to reflect your internal dossier lifecycle.
In the Dossier Info tab, you can also delete the dossier. It will then be moved to Trash. To do so, click Delete Dossier.
A dialog opens.
Enter "Delete Dossier" in this dialog and confirm.
You can find the deleted dossiers in Trash and restore them within 96 hours if necessary. After this period has expired, the dossier will be permanently deleted.
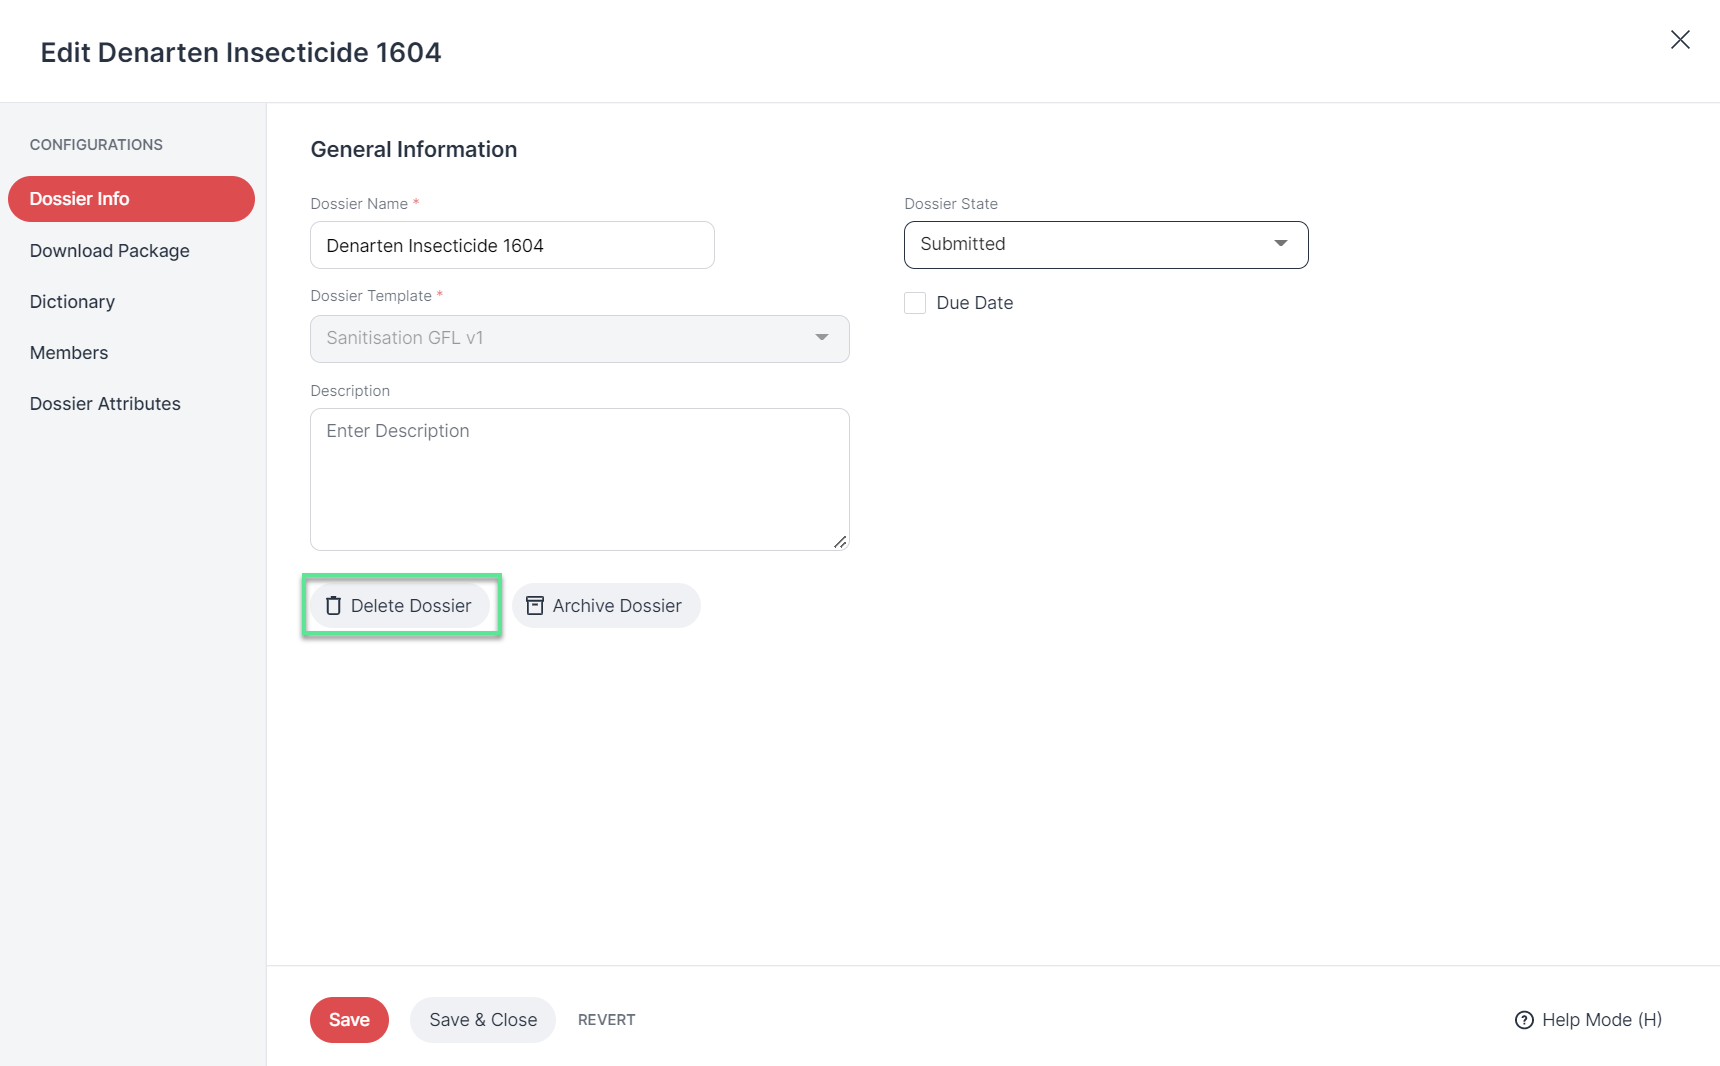 |
Delete dossier
Don't forget to save your changes!
You can also archive a dossier in the Dossier-Info section.
To do so, click Archive dossier.
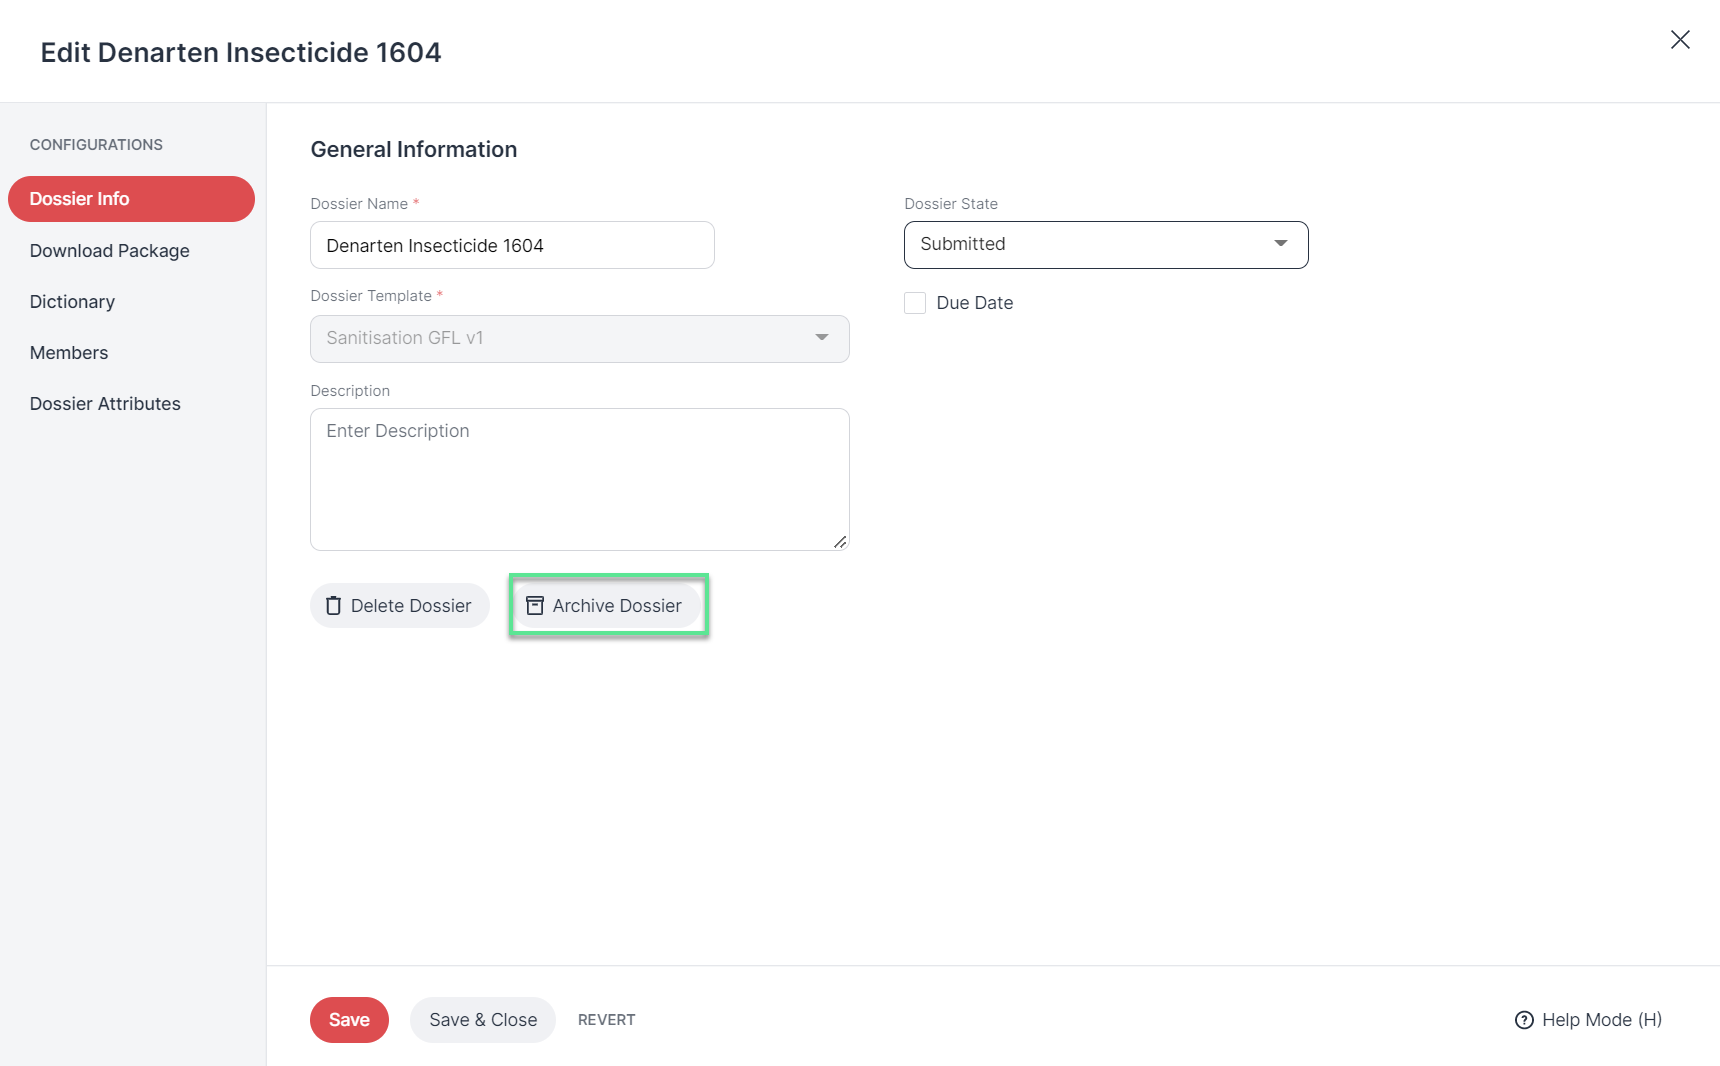 |
Archive dossier
A dialog opens.
Confirm that you want to archive the dossier and all its documents.
Good to know:
Archived dossiers can no longer be edited or restored.
But you can still open and read archived dossiers and their documents.
Don't forget to save your changes!
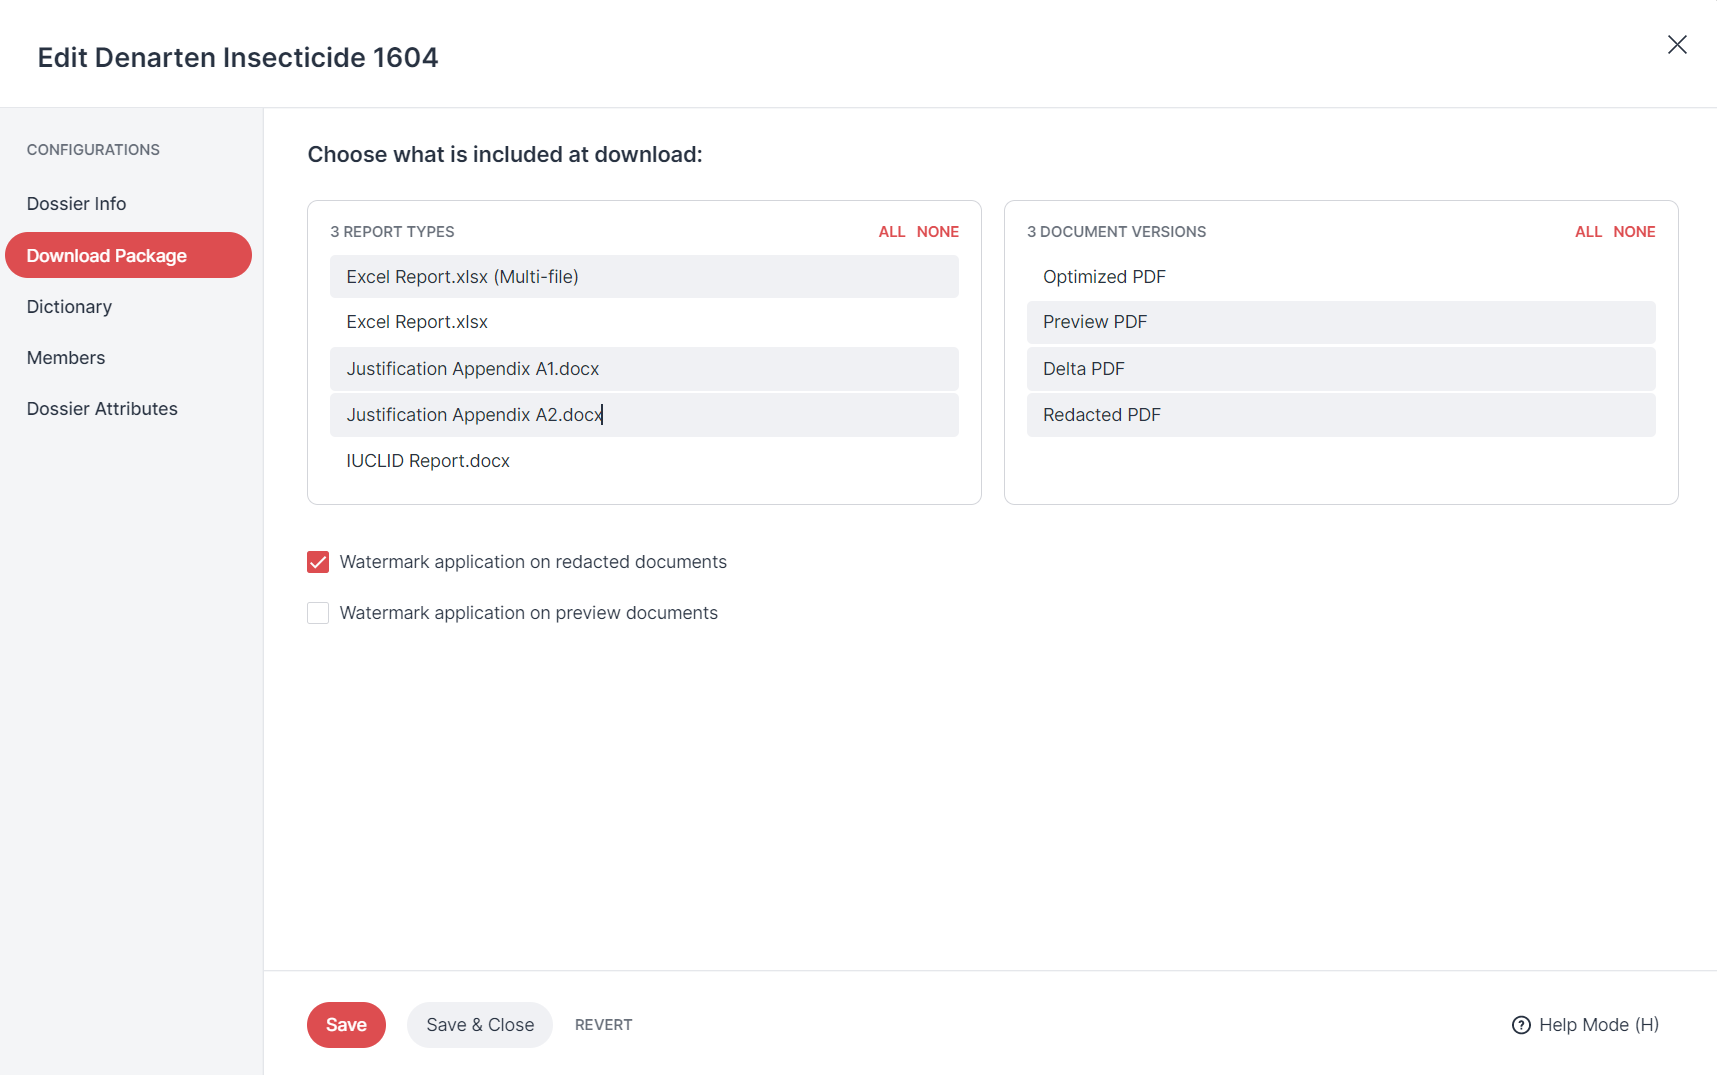
Under Download Package, you can specify which redaction reports and documents should be contained in the dossier download.
 |
Download Package
The following document versions are available:
Optimized PDF
Preview PDF
Delta PDF
Redacted PDF
Delta PDF is only relevant if redactions were imported from another file. It shows the changes that have been made to imported redactions:
Green: imported redactions that were left unedited
Red: imported redactions that have been deleted by the user
Blue: redactions that have been added
The Admin uploads the report templates in the admin area. The available output options are shown here and depend on the Admin's settings.
Don't forget to save your changes!
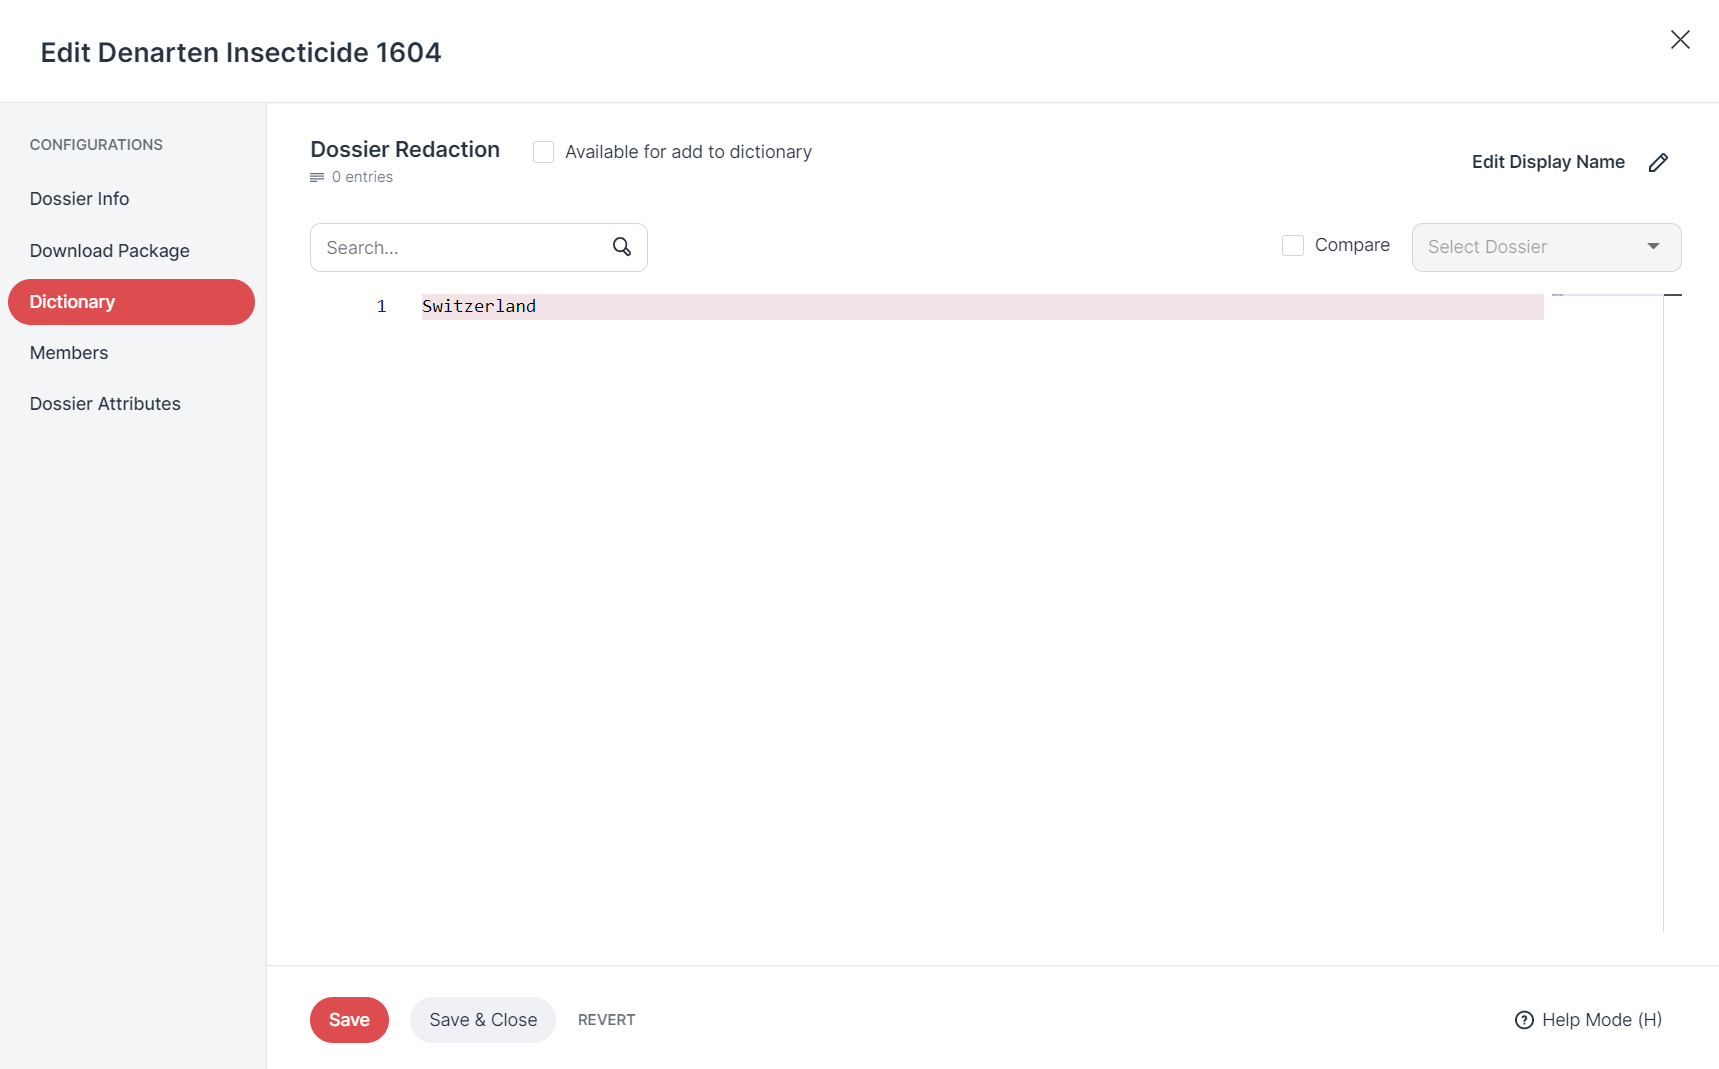
Under Dossier Dictionary, you can edit the dossier dictionary.
A separate dossier dictionary is automatically created for each dossier.
You can also access this dictionary via the dossier's dashboard.
As the Dossier Owner, you can edit the Dossier Dictionary, add entries and compare it to other Dossier Dictionaries.
Under what circumstances does it make sense to add entries to the Dossier Dictionary? It is advisable to make entries in the dossier dictionary if a specific redaction is to be made in a dossier that does not apply to other dossiers.
 |
Dossier Dictionary
To add an entry to the Dossier Dictionary:
To do this, click on the Dossier Dictionary entry in the dashboard.
The Dossier Dictionary window opens (see below).
On the right side of the window, you will see a numbered list with the dictionary entries. If no entries have yet been created, an empty gray line is displayed with a 1 in front of it.
Select a dictionary entry to edit it or click in the empty gray line to create a new entry.
Would you like to add another entry? Press the Enter key.
Another gray line then appears.
Confirm your changes by clicking Save or Save & Close.
To compare two dictionaries:
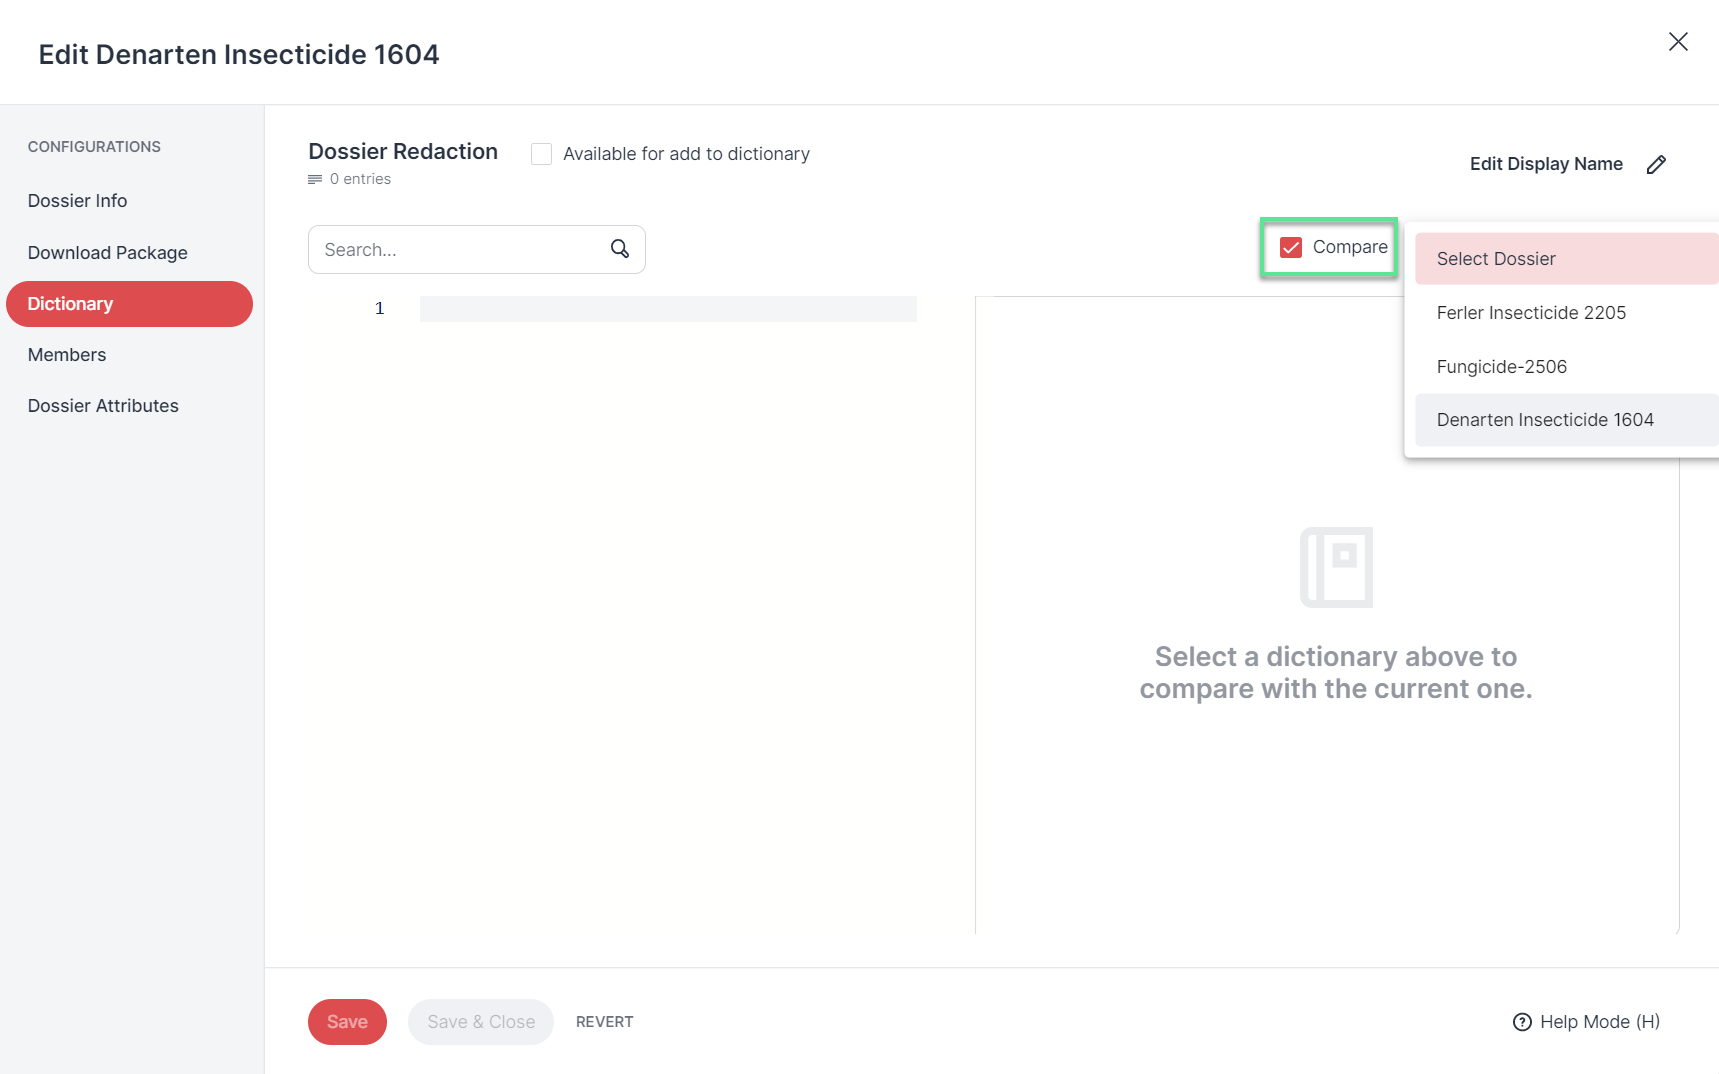 |
Comparing the dossier dictionary to other dictionaries
Tick the Compare checkbox in the bar above the dictionary entries.
That will enable the Select Dossier Template drop-down menu next to the checkbox.
That will enable the second drop-down menu. Next, select the dictionary you want to compare to from this second drop-down menu.
The selected comparison dictionary then appears to the right of the current or active dictionary.
Good to know:
Entries that are only available in the current or active dictionary are highlighted in green in the comparison view.
Entries only available in the comparison dictionary are highlighted in red.
The following applies to the active dictionary (on the left): You can also change and delete entries and add new entries in the comparison view. That works exactly as described above.
It is not possible to edit the comparison dictionary (on the right) in the comparison view.
As the Dossier Owner, you can enable ‘Add to dictionary’ in order to allow other users to add entries to the dossier dictionary.
If the option is disabled, only the Dossier Owner can add entries to the dossier dictionary.
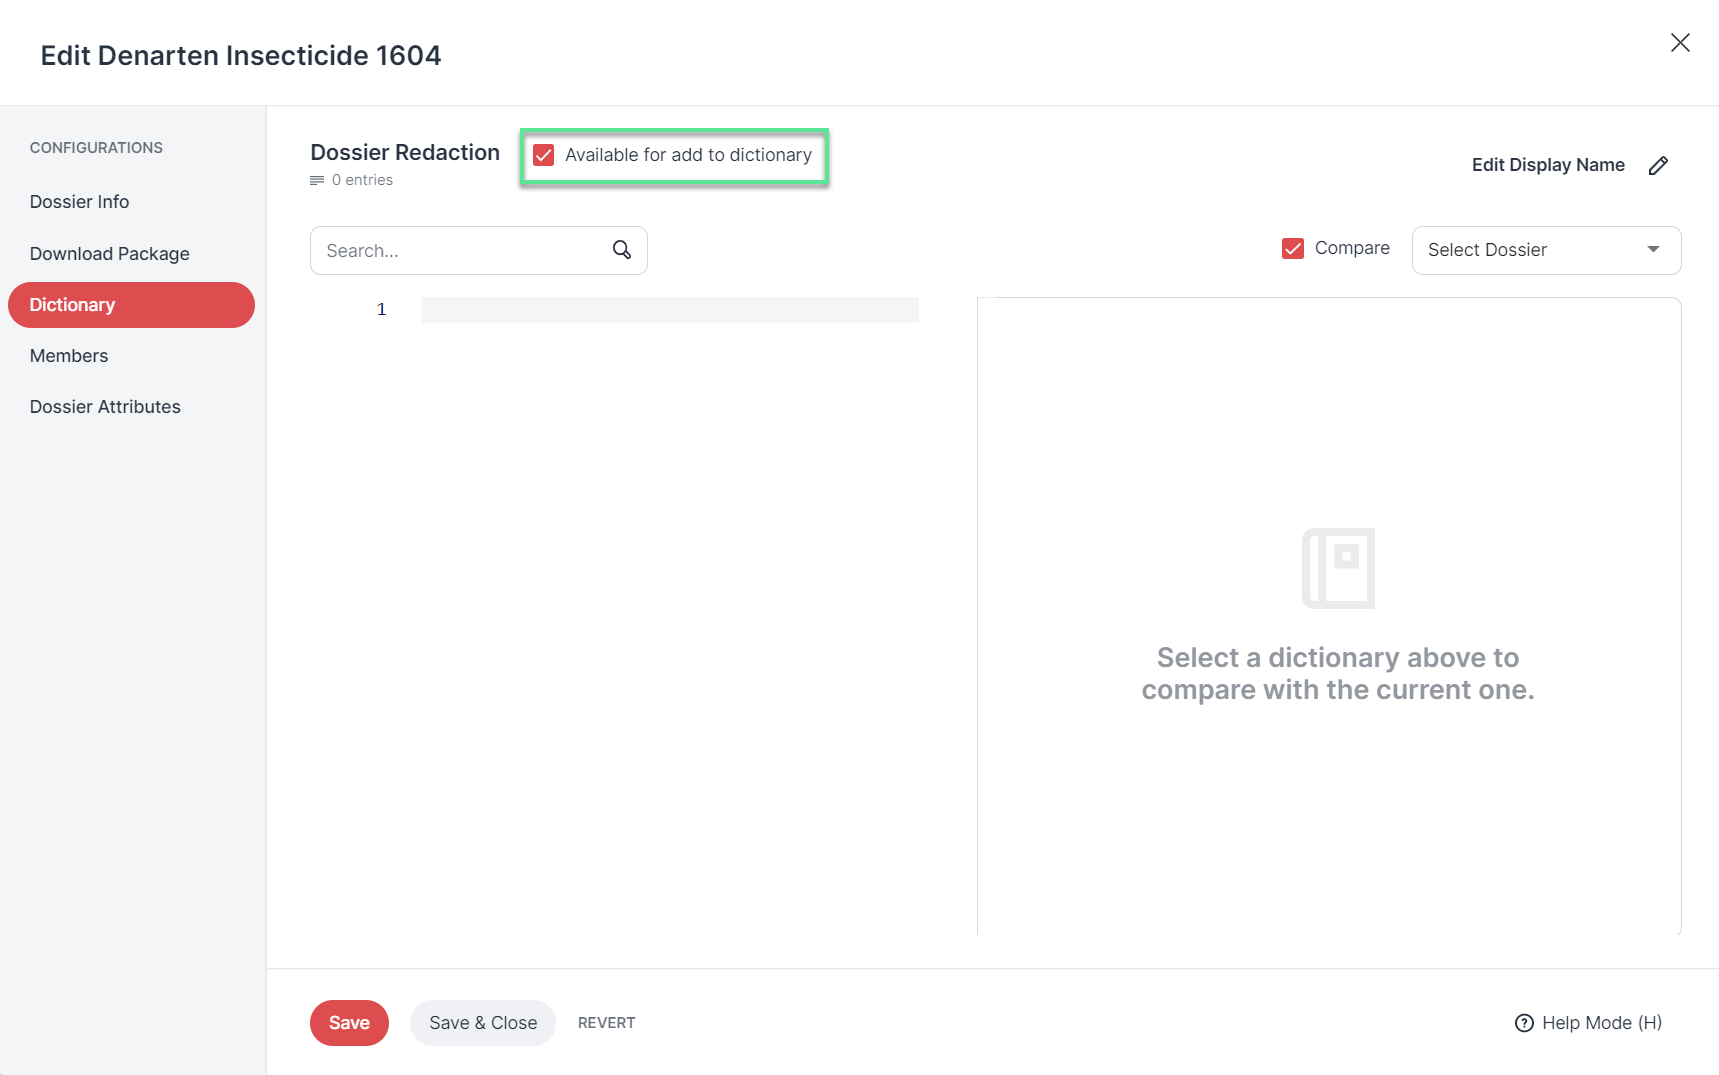 |
Enable ‘Add to dictionary’
Under "Edit Display Name", you can change the display name of the dictionary:
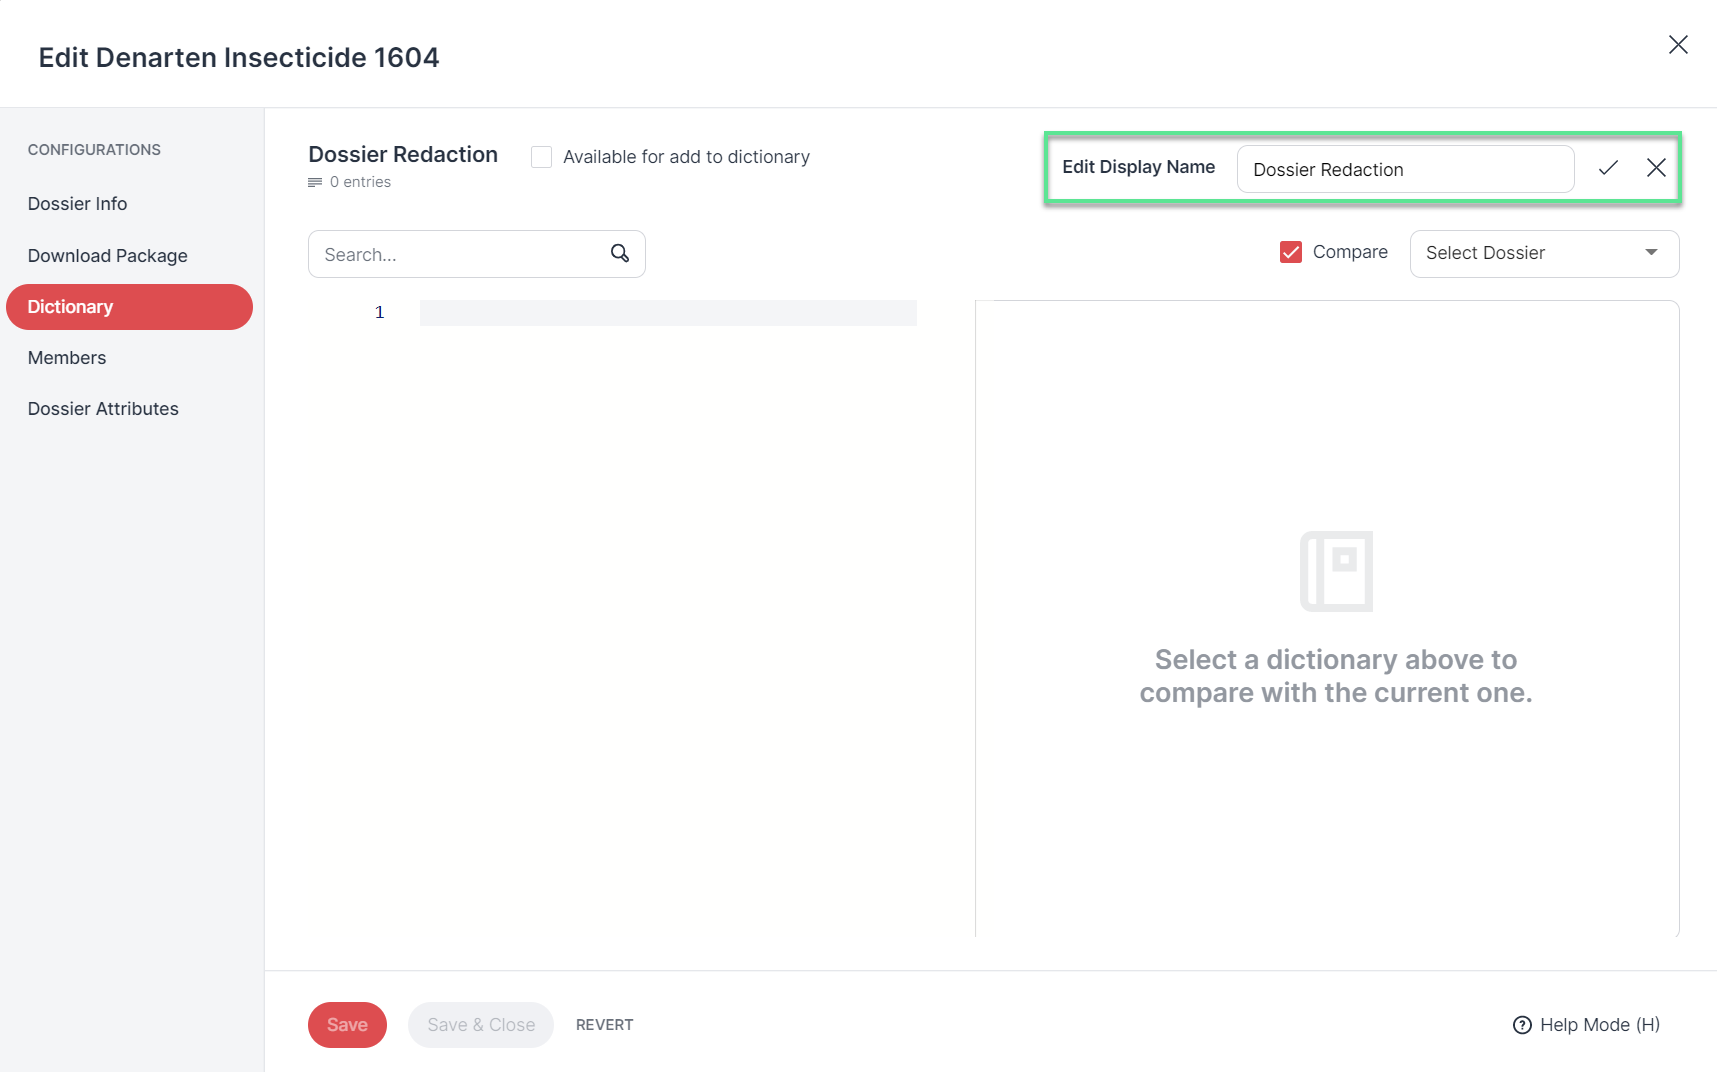 |
Change the display name of the dictionary
Don't forget to save your changes!
Under Members, you can change the Dossier Owner, manage the Reviewers and Approvers of the dossier, and add and delete Dossier Members.
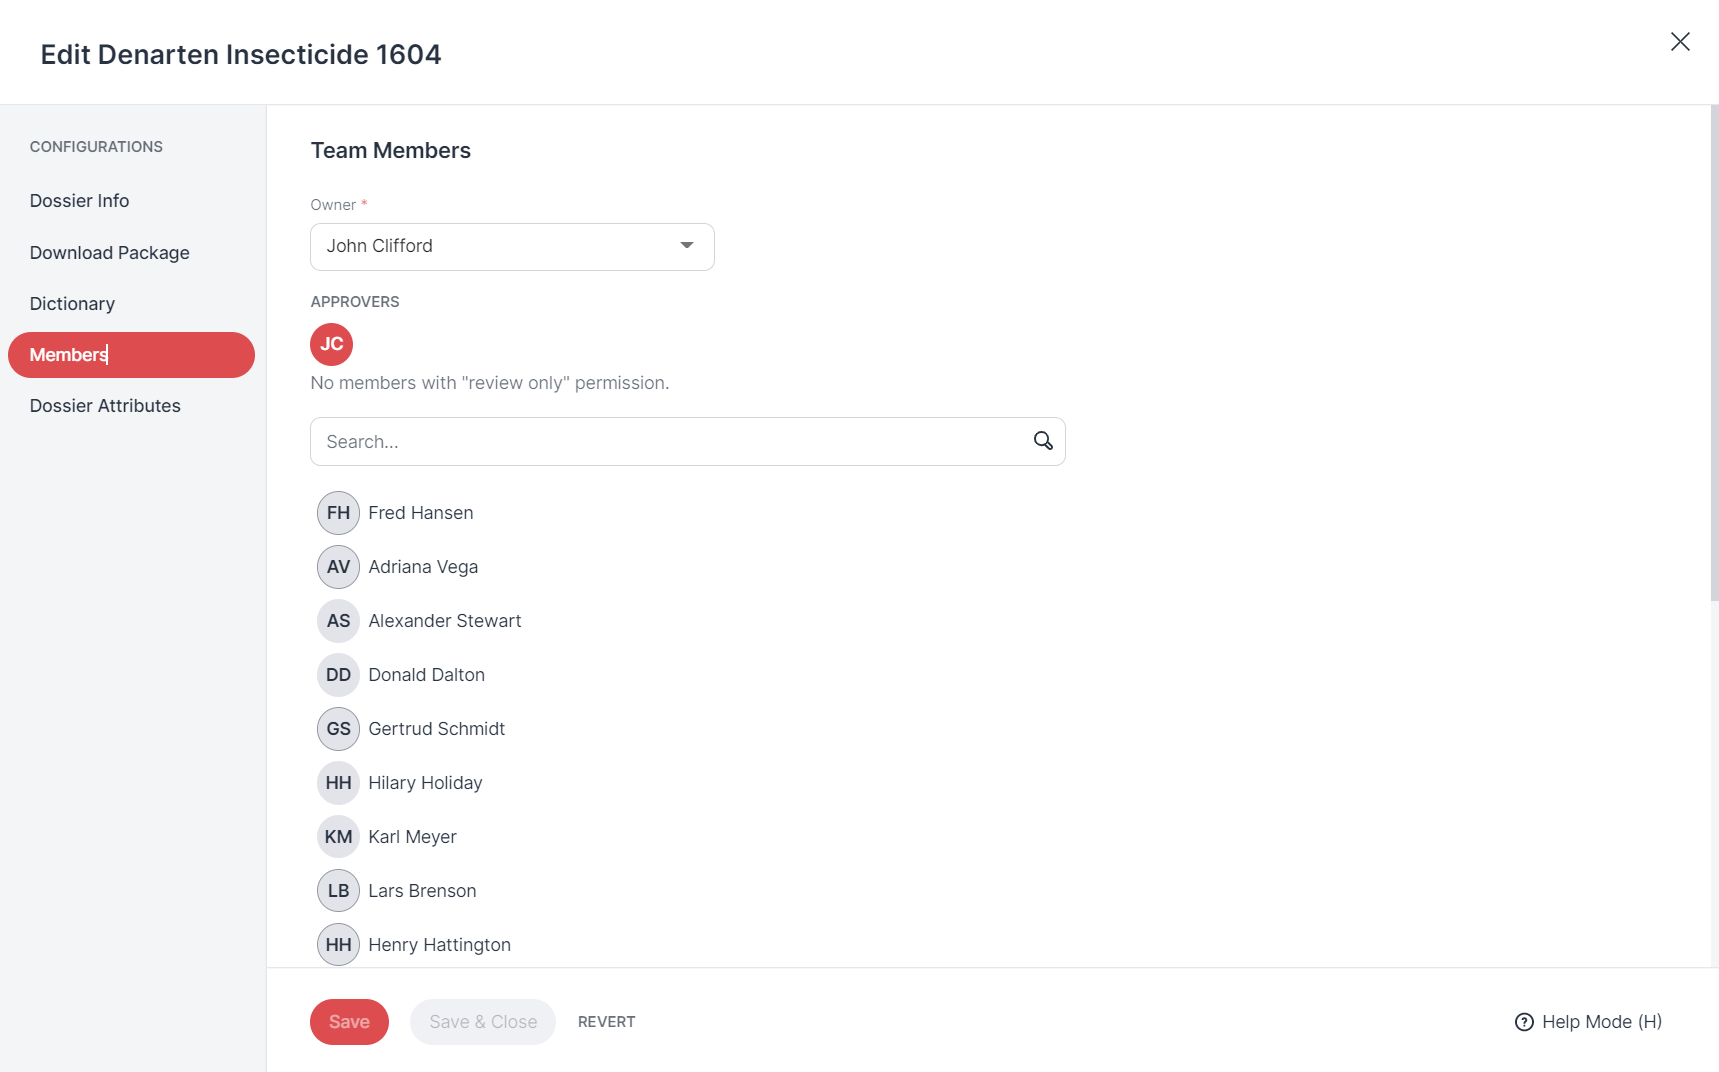 |
Dossier Members
To add more members:
Enter a name in the search bar or hover your mouse over the user list below the search bar.
Users who are already Dossier Members are highlighted in gray in this list.
If you hover over the name of a non-member, a gray box will appear.
Click on the check mark on the right in the gray box to make the user a Dossier Member. (Click the check mark again to remove the user as a Dossier Member.)
Save your changes.
To make a user an Approver:
Users who are already members of the dossier are highlighted in gray in the user list. On the right, you will see the option Make Approver.
Activate the checkbox to the left of it to grant the user the Approver authorization.
A tick appears in the control field to confirm.
Then save your selection.
Good to know:
There can be multiple Approvers in a dossier.
Don't forget to save your changes!
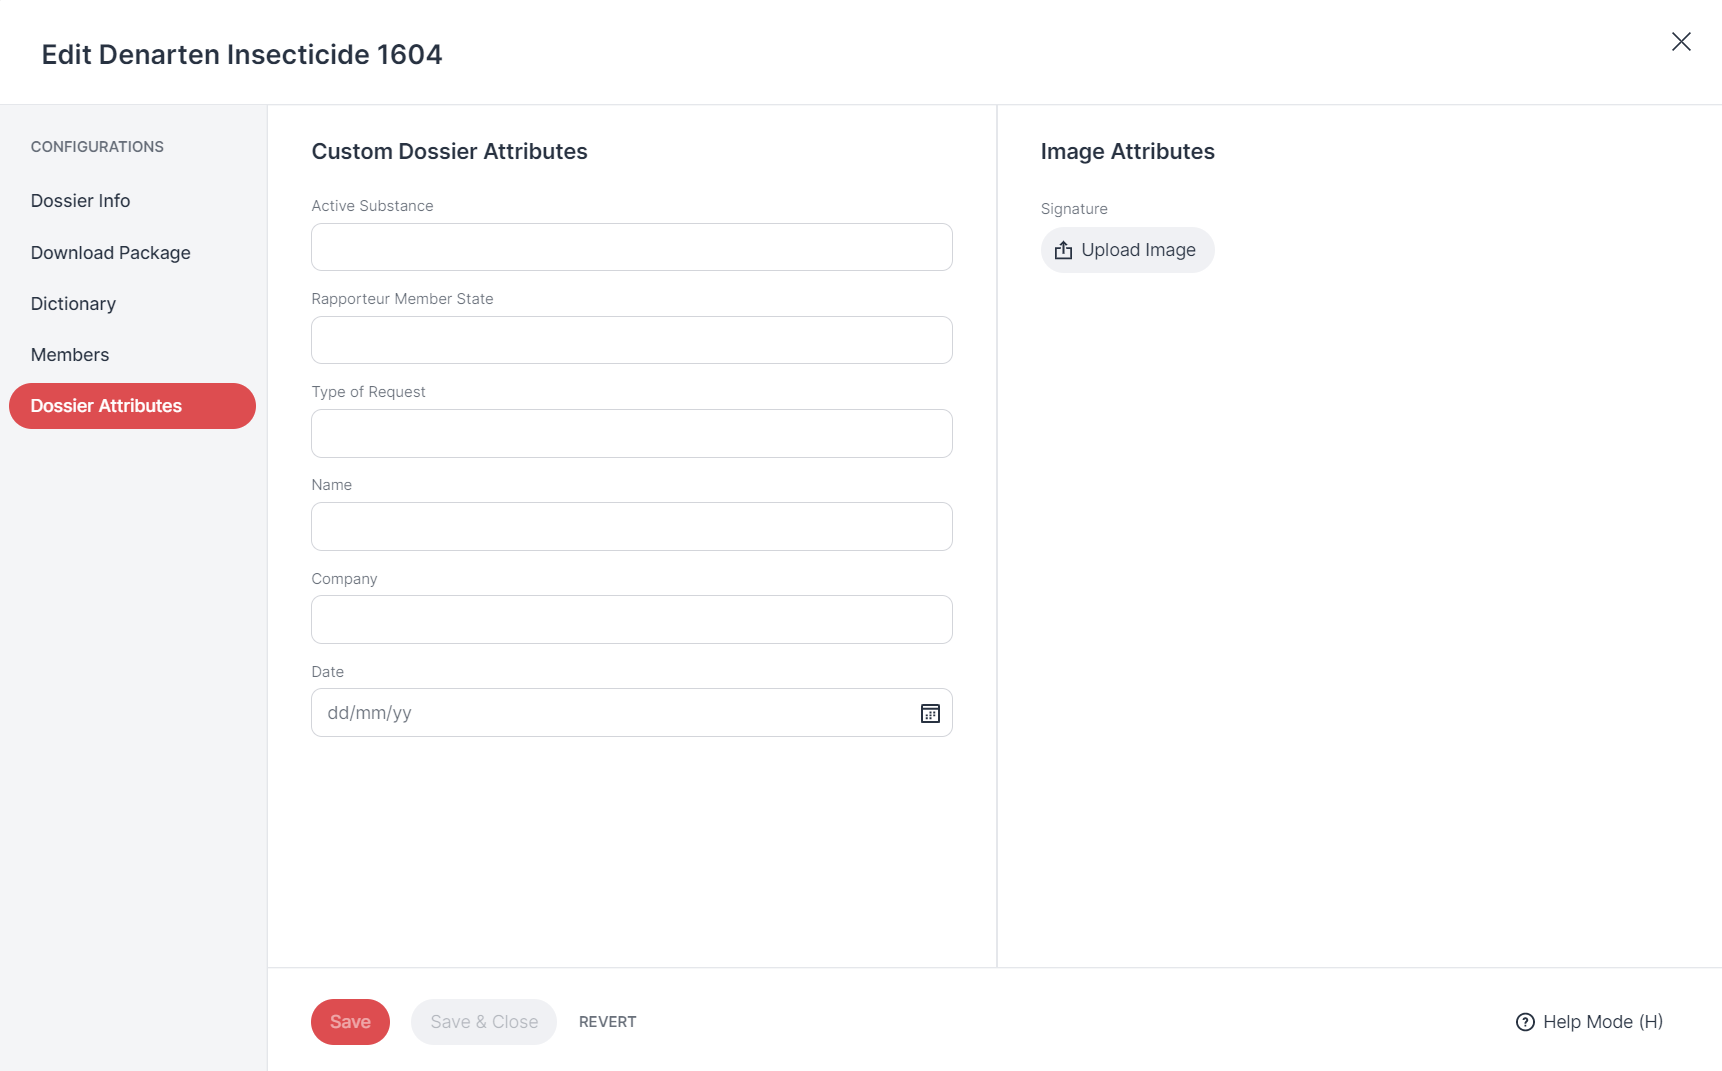
Dossier attributes are dossier-specific metadata.
Under Dossier attributes, you can view the dossier attributes and enter values for the dossier attributes.
Which fields do you find there? That depends on which dossier attributes the Admin specified in the linked dossier template.
Under Image Attributes, you can upload templates for dossiers and images - for example, signatures in image format.
Good to know:
Only users with the Dossier Owner permission can enter the values for the dossier attributes.
 |
Dossier Attributes
In case no attributes have been defined for a dossier, RedactManager informs you that neither text nor image attributes are available for the dossier.
The dossier attributes are also displayed in the dossier dashboard. If you click on the Customize dossier attributes button, a list with the existing dossier attributes opens.
If you click on one of the attributes, the configuration window opens in which you, as the Dossier Owner, can enter the values for the attributes.
Dossier attributes on the dossier dashboard
Don't forget to save your changes!
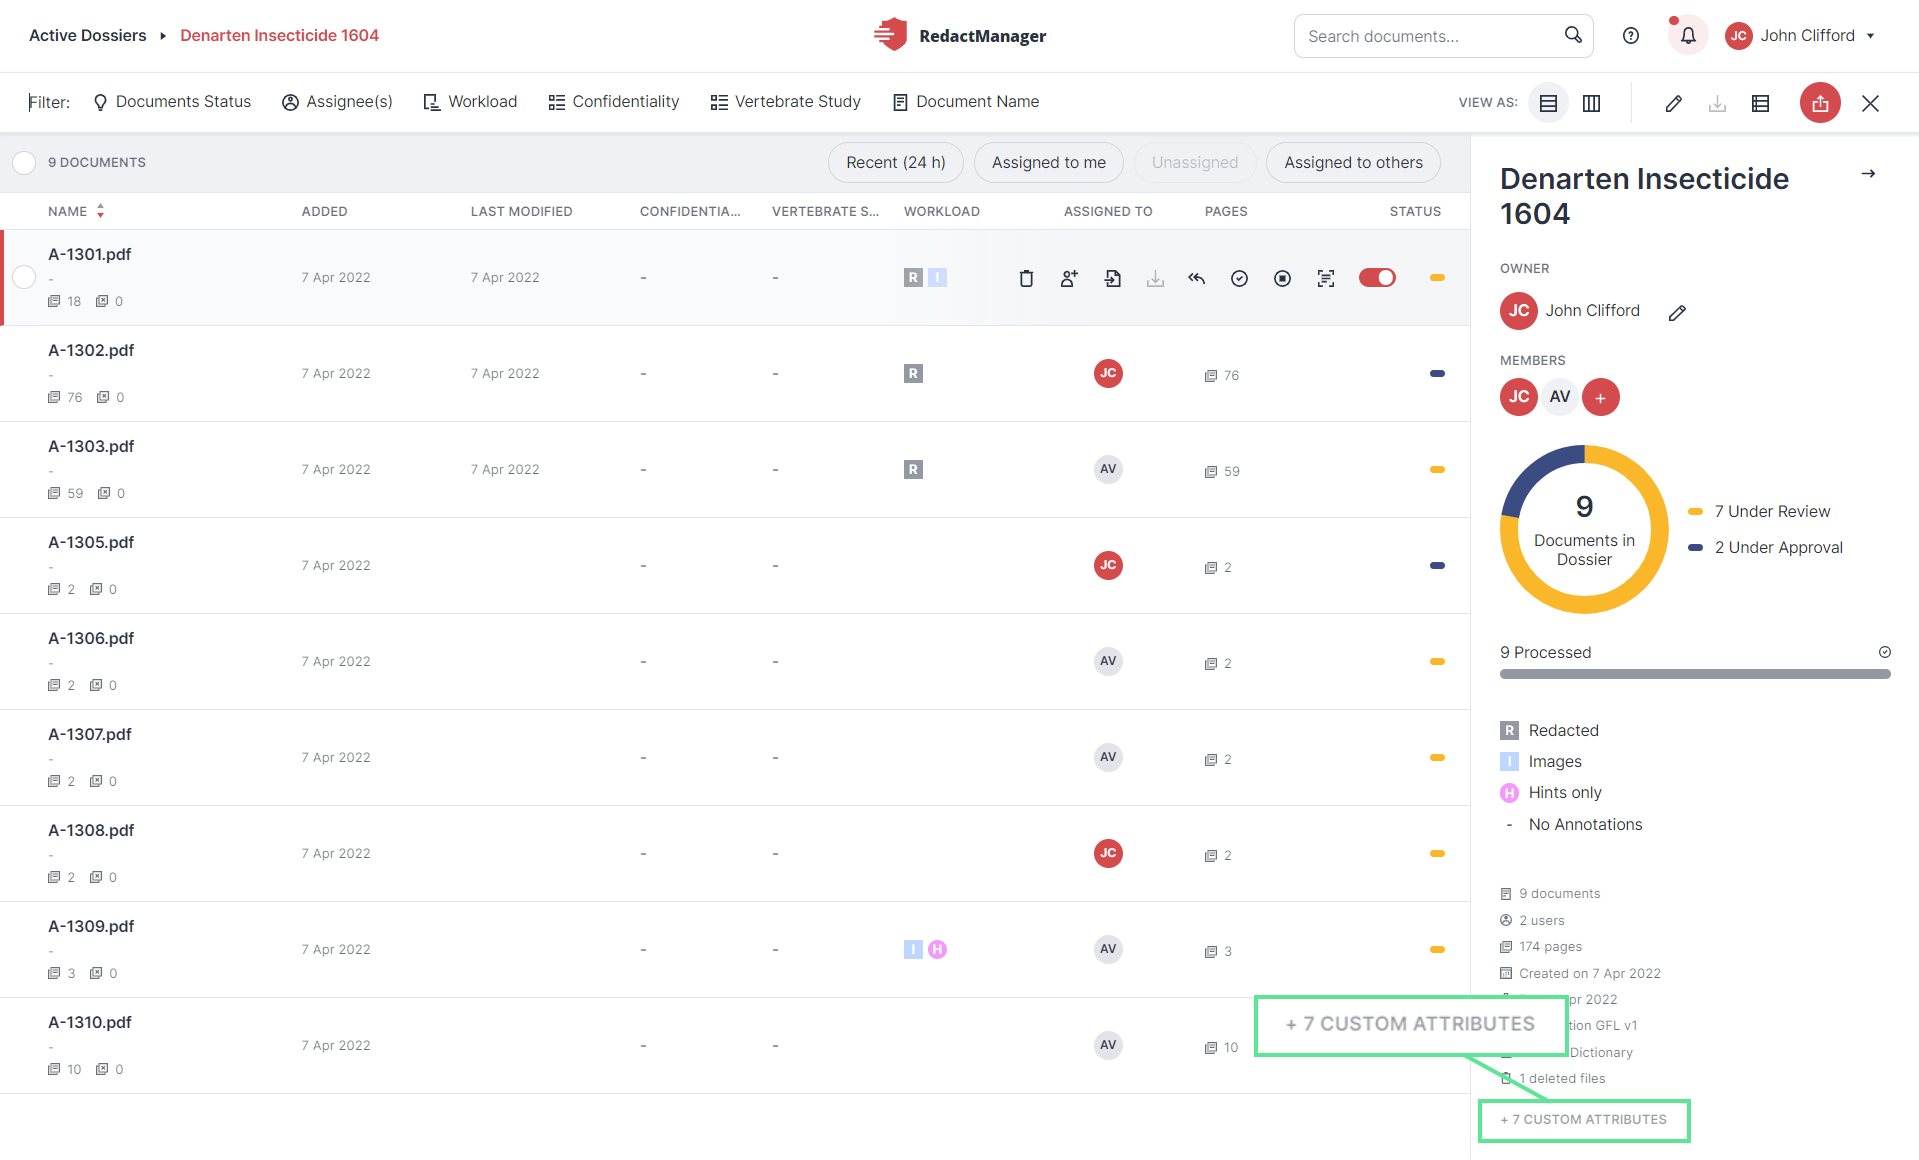
You are in the Dossier Overview.
If you move the mouse over the dossier list and stop on a dossier, the processing icon will appear on the right and the download icon .
Good to know:
The download icon is only enabled if all documents in the dossier have been approved.
The status of the documents in a dossier is indicated by a colored bar in the dossier list.
Here you will find an overview of the meaning of the different colors.
How to download a dossier:
Click the download icon in the dossier list
to generate the download package for the dossier.The RedactManager informs you that your download package has been added to the queue.
The notification will contain a link to My Downloads in your user menu and account. You will find all of your download packages there.
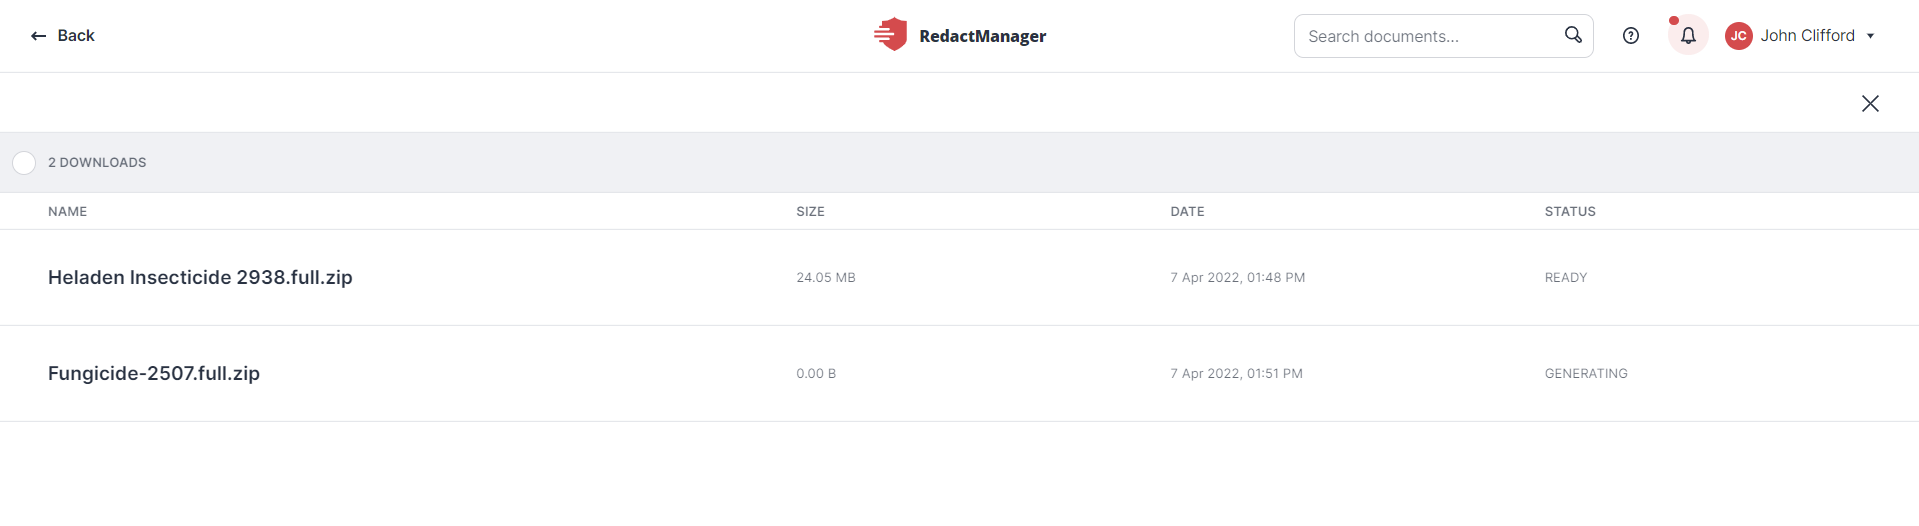
My Downloads
Access My Downloads via the link in the download notification or via your user profile.
A list of all your downloads—including names, sizes, modification dates, and status—is displayed. If a download package is not yet ready for download, its status is Generating. Once the package is complete and ready for download, its status changes to Ready.
Hover over the download list and click the download icon
to download the download package.The download package is downloaded as a zip file.
Extract the zip file to the desired storage folder.
Optional: Click the trash can icon under My Downloads
 to delete the download package.
The Bulk selection allows you to select and delete several download packages. To use bulk selection, click the circles to the left of the respective download packages.
 |
Bulk selection for download packages
The download folder contains the following files:
Good to know:
When creating a dossier, you specify which of the listed files will be part of the download package (apart from the redacted documents).
Redaction reports (detailing the redaction made on the document)
These reports can be one Excel document for each redacted document or one Excel document for the entire dossier.
If necessary, it can also contain a Word document with additional information about the redaction.
The original dossier documents (without redaction)
The redacted dossier documents
The dossier documents in preview mode
Good to know:
If you enabled the watermark application for preview and/or redacted documents when creating the dossier, the watermark is applied to the preview documents and/or redacted documents in the download package.
You will find a selection of filters in the bar above the dossier list.
If you select one of the filters with a left click, a drop-down menu opens with the respective filter options.
Check the box next to the appropriate option in the drop-down menu to filter the Dossiers by that option.
If a filter is activated, only the relevant dossiers are displayed. Dossiers that do not fall under the selection are hidden.
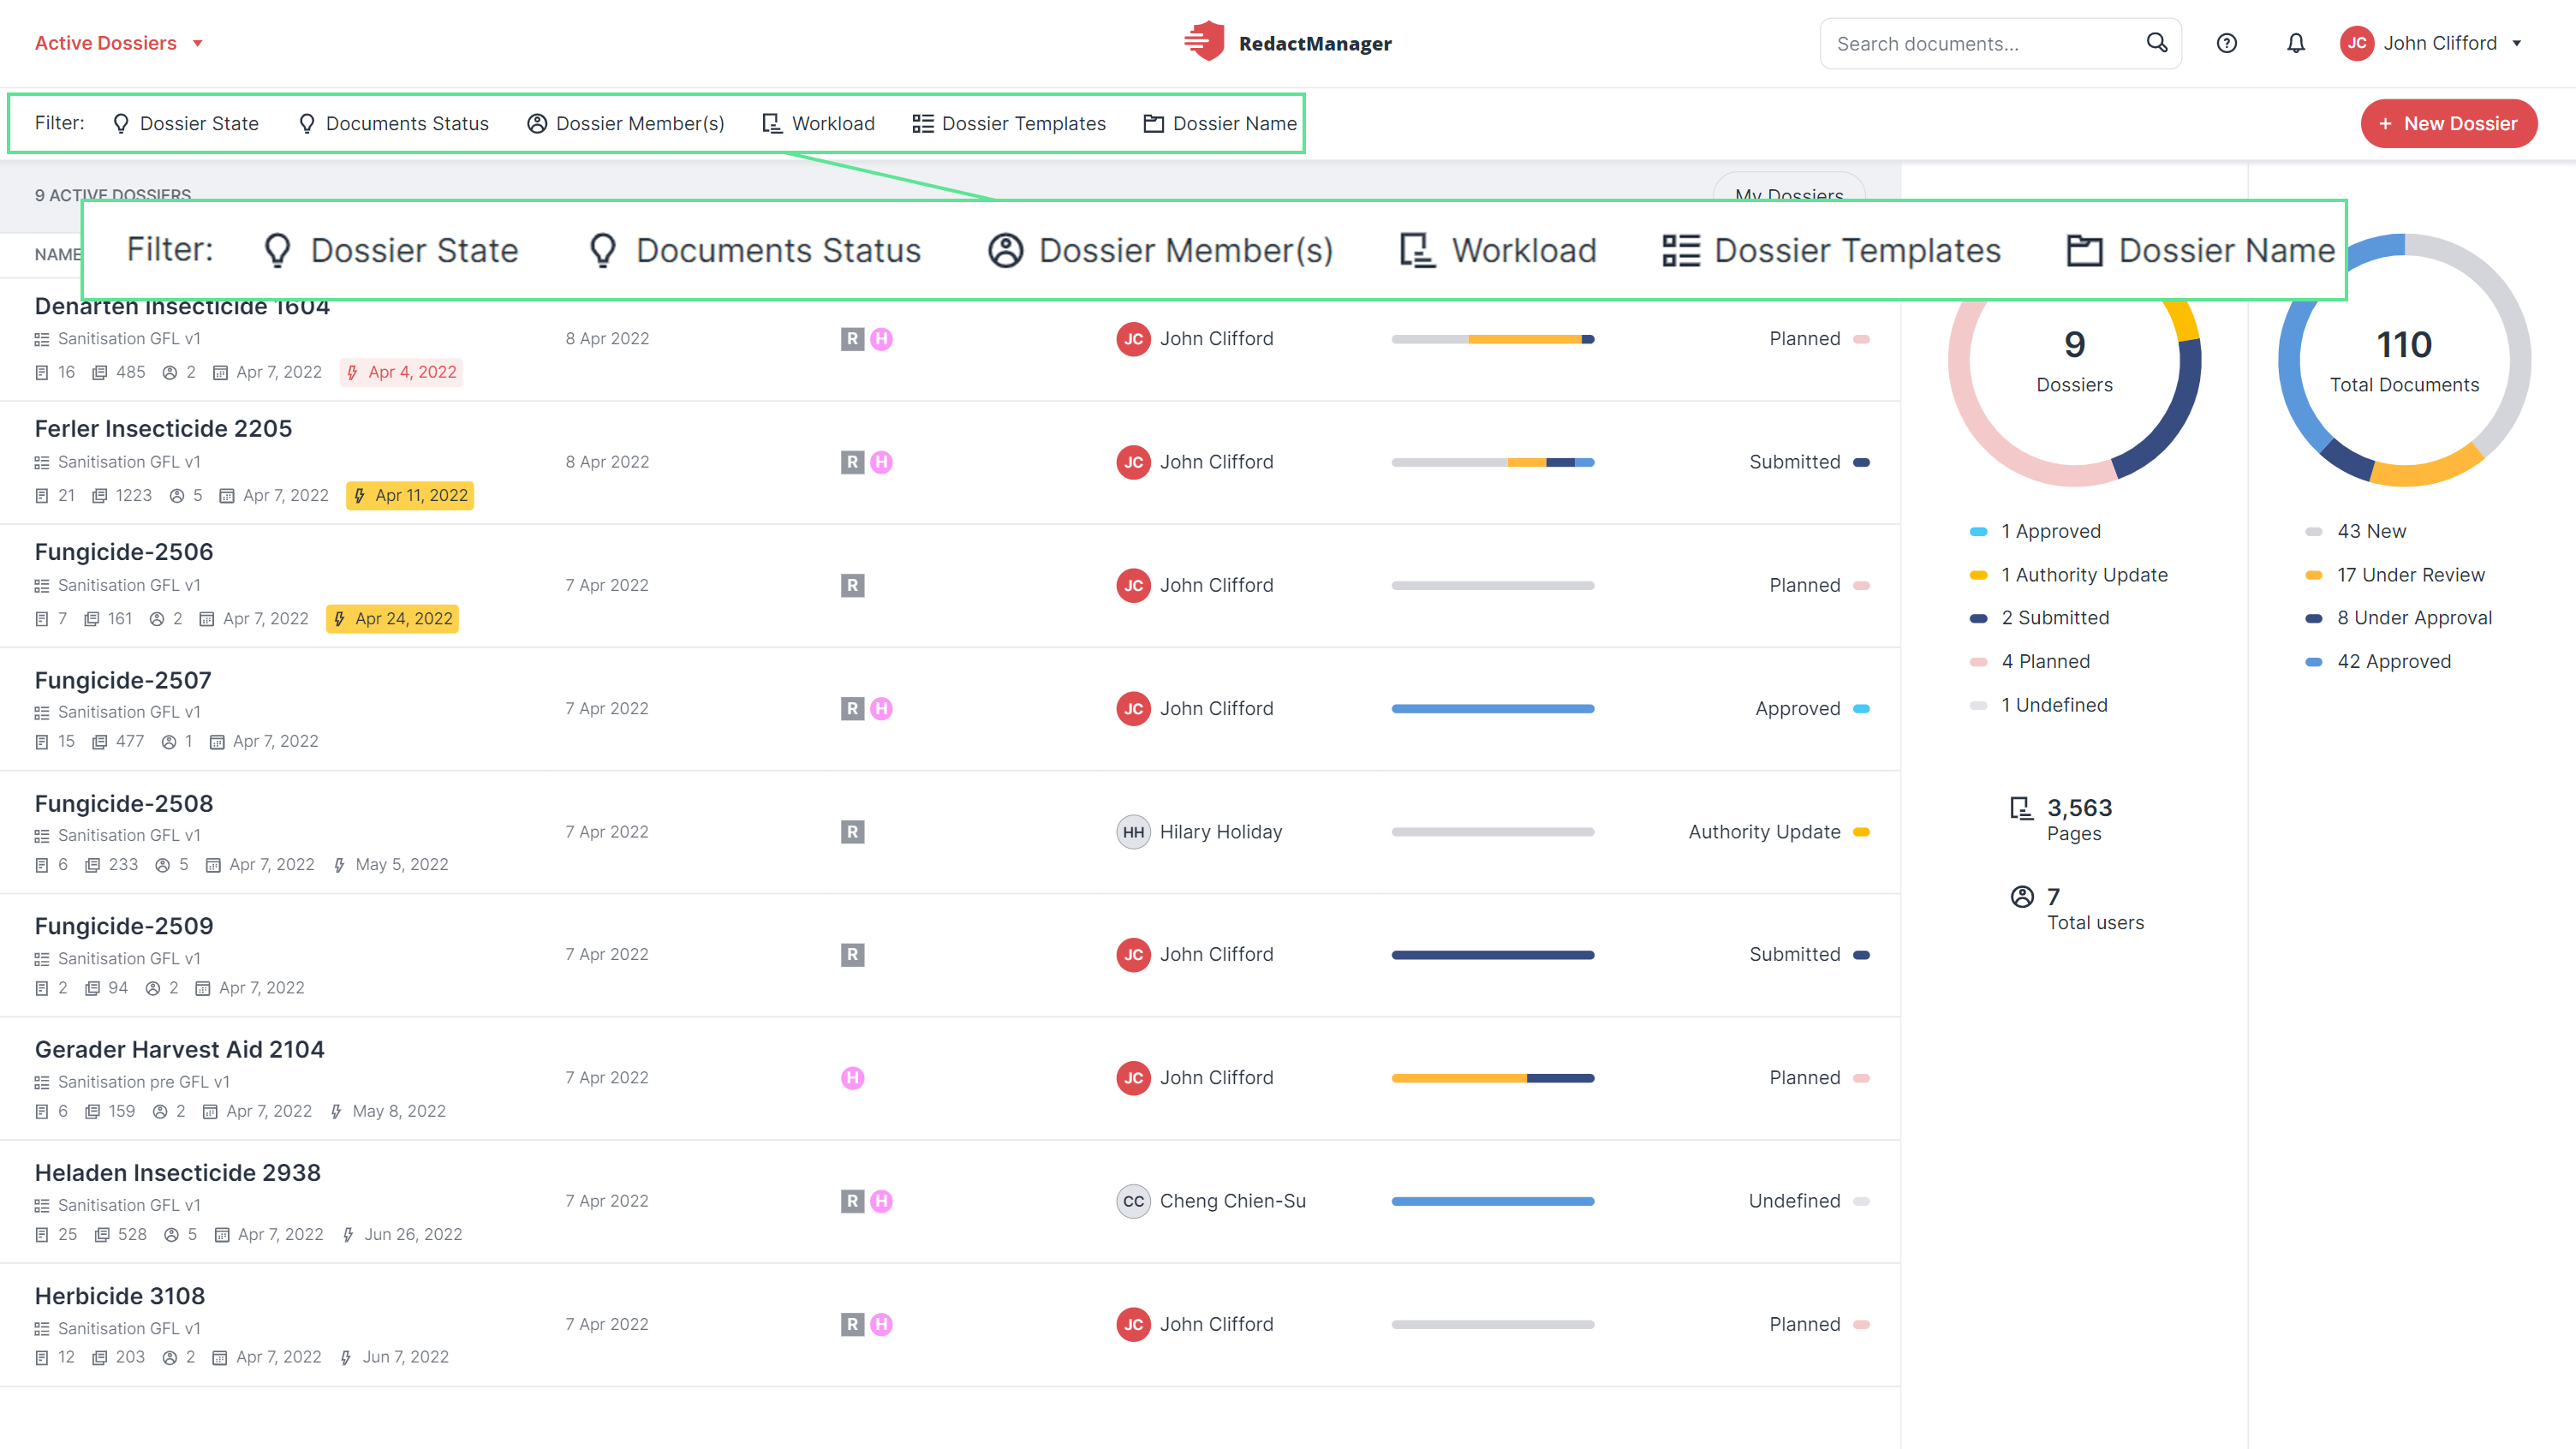
Dossier filters
You can choose from the following filter categories and activate several filters at the same time:
Status
Dossier members
Workload (filter by workload indicators)
Dossier Templates
Dossier Name (includes a search bar)

Filter by dossier name
You can delete a selected filter by deactivating the corresponding check box in the drop-down menu.
If you want to reset all of the selected filters, you can also click the Reset option that appears in the filter bar.
Activated filters remain active until they are deleted, or the page is reloaded.
You can find the following quick filter on top of the status column of the dossier list:
My Dossiers: This filter displays only the dossiers of which you are the Dossier Owner. The filter remains enabled until you reset it.
Whether dossiers are displayed to you even if you are not a dossier member depends on the settings made by the Admin.